Syntax: |
PGPENCRYPT |
[ source file ] [ target file ] [ options ] |
Arguments: |
[ source file ] |
A variable or string defining the file name of the file to encrypt with PGP. Wildcards are not permitted in [ source file ] or [ target file ]. |
|
[ target file ] |
A variable or string defining the file name of the newly encrypted file; if the file existed, it will be overwritten. The target file may not be the same as the source file. |
Options: |
/armor |
Select this option to ASCII armor the [ target file ]. |
|
/cipher=xx |
Specify the encryption cipher. The possible values are: AES, AES192, AES256, IDEA, CAST5, Blowfish, Twofish, and 3DES |
|
/compat |
Creates an output file compatible with older implementations of PGP but cannot create a file over 2GB in size. This option may not be combined with the /cipher option. |
|
/pw=xx |
This option is used together with the /sign option. The purpose of this option is to specify the passphrase associated with the private key that will be used to digitally sign the output file. This option is not required for keys created in the Configurator using the "save passphrase" feature. |
|
/sign |
Select this option to digitally sign the output file using your private key. If your private key was not created in the Configurator using the "save passphrase" feature you will need to also use the /pw=xx option to specify the key passphrase. |
|
/signuser=xx |
This option is used together with the /sign option. The purpose of this option is to specify the signer's private key. The value passed must be at least a partial match to one, and only one, private key as listed in the Key Name or Key ID column on the Manage Keys form. |
|
/textmode |
Select this option if you wish to have [ target file ] saved in a text mode format. |
|
/user=xx |
The /user option is required to specify the public PGP key of the recipient of the encrypted file. The value passed must match one, and only one, public key as listed in either the Key Name or Key ID column on the Manage Keys form. To encrypt a file with multiple public keys use the pipe character "|" to separate each key identifier string or simply repeat this option once for each public key. |
.
This script command encrypts a file using PGP encryption. Files may be decrypted using the Robo-FTP PGPDECRYPT script command or any other PGP or GPG encryption application.
To encrypt a file, you must first import the public key of the recipient into Robo-FTP. Keys are imported by way of the PGPIMPORT script command or by using the Import Key functionality in the Robo-FTP Configurator. Your private key is also required if you intend to add a digital signature to the encrypted file. Imported keys are displayed in the Configurator on the Configure PGP menu when you click the Manage Keys button. Here is an image showing the Manage Keys grid with one public key:
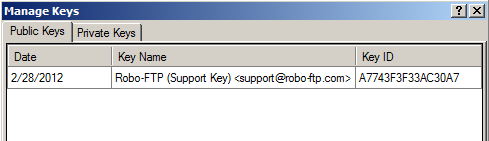
The /user and /signuser options are used to specify the keys used for encrypting and signing. The values passed to these options must be at least partial matches to one of the three values that are displayed in the Key Name column on the Manage Keys grid. The Key Name column is a composite value formatted as: name (comment) <email>. Do not include the parenthesis or angle brackets when specifying the option value.
The /user and /signuser options also accept a match or partial match of the Key ID column. A partial match from the Key ID column must be exactly 8 sequential characters.
Use the /armor option if you wish the resulting file to be in ASCII armored format.
Use the /cipher option to select the cipher used by Robo-FTP to encrypt a file. The default CAST5 cipher should be fine for most situations but some providers may require (or exclude) a particular cipher. The available ciphers are: AES, AES192, AES256, IDEA, CAST5, Blowfish, Twofish, and 3DES. The /compat option may not be used with /cipher because /compat always uses the IDEA cipher.
Use the /sign option if you wish the resulting file to be digitally signed.
Use the /textmode option if you wish the resulting file to be a text mode format.
When signing an encrypted file, you must specify your passphrase either within the command itself using the /pw option or by previously specifying it in the Robo-FTP Configurator.
Important
When you use the Configurator to create new PGP keys you may optionally choose to save the passphrase. If you choose this option, the password is saved in an encrypted format in the Windows registry along with Robo-FTP's other settings. Later, when you use these keys for encryption or decryption, the passphrase will not appear in the console window nor will it be written to any log file. If you choose not to save the passphrase (or if you use externally generated PGP keys) then you will probably need to specify the passphrase in clear-text in a script file. Therefore, saving the passphrase when you create the key is the most secure option.
It is typical for encrypted files to have an extension of .pgp, .gpg, or .asc (if ascii armored). In most of the examples below, we add one of these extensions at the end of the original file to create the name of the encrypted version of the file. We recommend that you adopt these conventions as well.
Original File Name: "datafile.txt"
Encrypted File Name: "datafile.txt.pgp"
For ASCII armored files (see below):
Original File Name: "datafile.txt"
Encrypted File Name: "datafile.txt.asc"
In the example below, a file is encrypted using a public key identified by a partial match on the Key Name column.
PGPENCRYPT "datafile.txt" "datafile.txt.pgp" /user="Richard Tracy"
In the following example, a file is encrypted using a public key identified by an exact match on the Key ID column.
PGPENCRYPT "datafile.txt" "datafile.txt.pgp" /user="A7743F3F33AC30A7"
Two public keys are used for encryption when the /user option is specified twice or when the pipe character is used to separate the key identification string. Both lines below produce the same result.
PGPENCRYPT "datafile.txt" "datafile.txt.pgp" /user="Richard Tracy" /user="Mike Hammer"
PGPENCRYPT "datafile.txt" "datafile.txt.pgp" /user="Richard Tracy|Mike Hammer"
The following example encrypts a file and specifies the output format to be ASCII armored. (The .asc extension is typically used for these types of files.)
PGPENCRYPT "datafile.txt" "datafile.txt.asc" /user="Richard Tracy" /armor
The following example encrypts a file for Richard Tracy and digitally signs it using a specified private key (John Doe).
PGPENCRYPT "datafile.txt" "datafile.txt.pgp" /user="Richard" /signuser="John Doe" /pw="John Doe's passphrase"
Hint: If the recipient is unable to decrypt the file ask them for the Key ID of the public key that they expected you to use for encryption. The Key ID must match the value shown on the Manage Keys window in the Configurator. Some PGP software only displays an 8 character Key ID so in those cases you'll compare with the last 8 digits of the value shown in the Configurator. For a more precise comparison you can right-click the grid row and choose "Show Key Fingerprint" from the pop-up context menu.
Note: When the TMPFILE command is active, the output [ target file ] created by this command will have a different name until the encryption process is successfully completed.
Related command(s): PGPDECRYPT, PGPIMPORT, ZIP, TMPNAME
See also: Robo-FTP and PGP Cryptography, Configure PGP Menu