Logging Overview
Log files are by far the most important tools for troubleshooting issues encountered when executing command scripts. Robo-FTP can generate three types of log files that can help you debug a command script that did not execute as expected:
•Script Log - lists all commands executed and status messages returned
•Trace Log - records protocol trace and diagnostic messages helpful in troubleshooting many errors
•Debug Logs - for use by Support only
Enabling the "Script Log File" checkbox in the Configurator causes Robo-FTP to append indefinitely to the specified log file, potentially resulting in a very large log file. For more control over generating script logs, use the LOG command in your script(s) instead of enabling the script log via this checkbox. The same considerations apply to the Trace Log File checkbox. Use the TRACELOG command in your scripts for more control over how trace logs are generated. In contrast, debug logs are automatically pruned daily according to the "Keep files" setting as specified in the Configurator's Logging menu. See: Debug Logging.
Carefully follow the five steps below to create the Script Log and Trace Log files.
Step 1) Use the LOG and TRACELOG Commands in your Script or Enable the Default Log Files
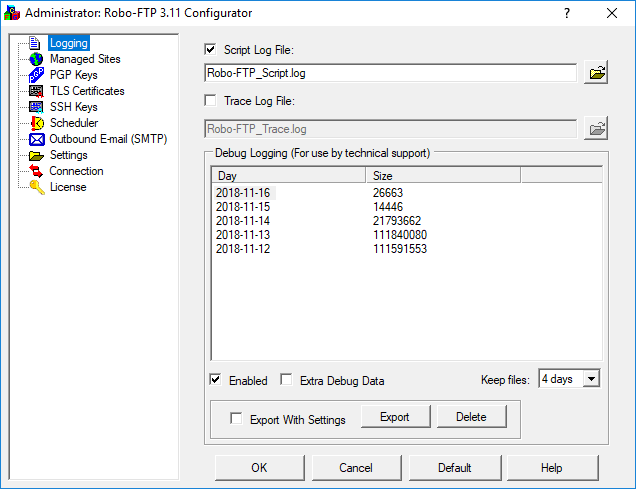
We recommend using the LOG and TRACELOG commands in your scripts or enabling the Script Log and Trace Log with their respective checkboxes, because they are crucial for troubleshooting all but the most trivial problems. In the image below of the Configurator's Logging menu, the default Script and Trace Logs are enabled. The default folder for these logs is INSTALLDIR\ProgramData\Logs directory, where INSTALLDIR is the Robo-FTP installation folder, if that directory is writable, or else the current user's data directory (INSTALLDIR\UserData\USERNAME\Logs) but you can change the path by clicking the folder button to the right of the log file name.
Step 2) Run your script
Execute the script (or series of commands) to create a fresh set of log files showing the problem that you want to troubleshoot. If you are in a hurry but your script is configured to run on a schedule as a Windows Service or Scheduled Task you might consider launching it from the main console window instead of waiting for the next regularly scheduled execution.
Step 3) Open the log files.
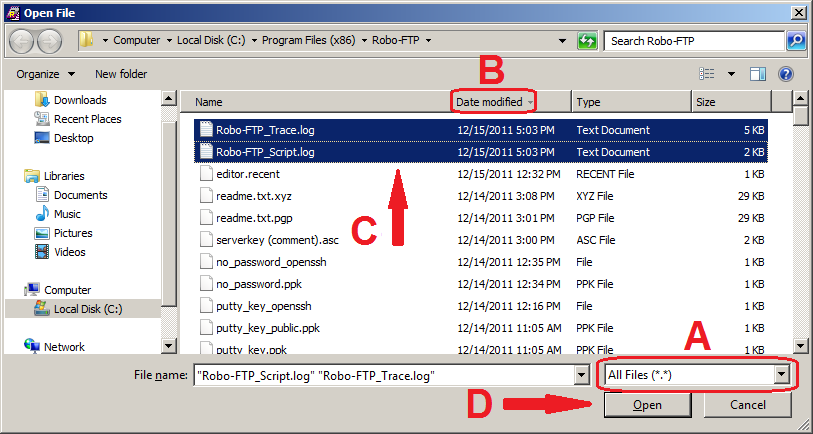
Open the Script Log and Trace Log files in a text editor program. To use the RoboEDIT script editor to open both log files at once in separate tabs, launch RoboEDIT and click File -> Open on the top menu and then follow these steps:
A.Change the file type filter to All Files (*.*) in the lower right corner of the Open File form.
B.Sort the files descending by date so the newly created log files appear near the top of the list. If your computer is not configured to display the modified date you can sort on the file Name column and scroll down to find the files.
C.Select both log files by holding down the Ctrl key and clicking both file names.
D.Click the Open button (or hit the Enter key) to open both log files at once. Each file will be displayed in a separate tab.
Step 4) Verify the timestamps
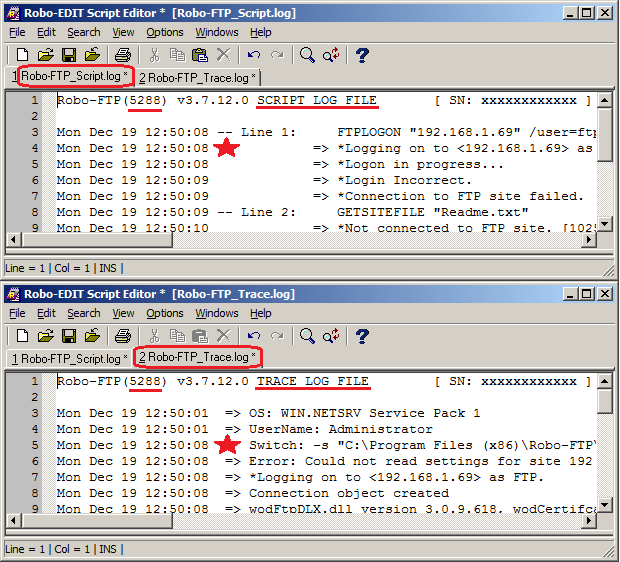
Each row of the Script Log and Trace Log files begins with a timestamp. Compare the current time to the timestamps in both logs to verify that each file captured the most recent script execution from step 2 above. The screenshot below shows each log file opened in a separate tab in the RoboEDIT program. Notice that although the top row timestamps do not match, later rows make clear that both files were created during the same script execution.
Step 5) Verify the Script Log shows the error
Examine the Script Log file and verify that it contains the script or commands that you want to troubleshoot. The screenshot below shows an example of a Script Log that does not contain useful troubleshooting information because the LOG command was used to redirect logging output to a different file. In this example, the troubleshooting information you really need is in the file named AcmeDownload_script.log instead of the default Robo-FTP_Script.log file.

If you can't find your log files, search your command script for the LOG or TRACELOG commands because they can override the default settings that you configured on the Logging menu in the Configurator. If your script uses the LOG or TRACELOG commands to specify a file name without a complete path, the log files will be placed in the INSTALLDIR\ProgramData\Logs directory if that directory is writable, or else they will be placed in the current user's data directory (INSTALLDIR\UserData\USERNAME\Logs).
The easiest way to find missing log files may be to simply log in to Windows under the user account that is normally used to launch your script and then run it in Robo-FTP's main console window. After script processing is complete, scroll back up in the console window and examine each line looking for the full path of the log files, like this:
*Script log file ready - C:\Program Files (x86)\Robo-FTP 3.11\ProgramData\my_script_log.txt
Logging will fail if the account Robo-FTP is running under lacks sufficient Windows permissions to create and modify the log files. Remember to always verify that your log files are still being created after migrating your Robo-FTP installation to another computer or after setting up Robo-FTP up to be launched as a scheduled task or as a Windows service.
Related command(s): LOG, TRACELOG
See also: Advanced Logging, Debug Logging, Troubleshooting, Interactive Debugging